How to Read and Write Excel Files using C# and Excel Interop Library

Read and Write Excel files using C#

Read and Write Excel files using C#

Microsoft Excel is powerful spreadsheet tool with lots of features for data visualization, analysis and documentation. Excel formats data in the form of rows and columns and cells. As a developer, many times you are required to read or write data into an Excel file. There are multiple ways to read and write data in excel programmatically i.e. by using COM Components and using third party components/SDKs.

This tutorial shows you how to Read and Write Excel files in Microsoft C#. We are going to use Microsoft COM Objects i.e. Excel 16 object in our application. Use the following sample C# source code for Excel reading and writing. There are multiple examples discussed in this tutorial to read Excel files using C# and write data back to Excel file.

Table of Contents

Write data to Excel file

The following C# code uses the Excel interop library to create a new Excel instance, open a specified workbook and write text to the first cell of the worksheet. It also includes cleanup code to release resources and ensure that the Excel process is fully closed.

// Set cursor as hourglass
Cursor.Current = Cursors.WaitCursor;
Excel.Application  xlApp = new Excel.Application();
Excel.Workbook xlWorkbook = xlApp.Workbooks.Open(FileName);
Excel._Worksheet xlWorksheet = xlWorkbook.Sheets[1];
Excel.Range xlRange = xlWorksheet.UsedRange;

xlWorksheet.Cells[1, 1] = txtWrite.Text;
xlApp.Visible = false;
xlApp.UserControl = false;
xlWorkbook.Save();

//cleanup
GC.Collect();
GC.WaitForPendingFinalizers();

//release com objects to fully kill excel process from running in the background
Marshal.ReleaseComObject(xlRange);
Marshal.ReleaseComObject(xlWorksheet);

//close and release
xlWorkbook.Close();
Marshal.ReleaseComObject(xlWorkbook);

//quit and release
xlApp.Quit();
Marshal.ReleaseComObject(xlApp);

// Set cursor as default arrow
Cursor.Current = Cursors.Default;

Read data from Excel file

The following C# code also uses the same mechanism to read the data from an Excel sheet. First, it creates a new Excel instance, open a specified workbook and read value from the second cell of the worksheet. It also includes cleanup code to release resources and ensure that the Excel process is fully closed.

// Set cursor as hourglass
Cursor.Current = Cursors.WaitCursor;

Excel.Application xlApp = new Excel.Application();
Excel.Workbook xlWorkbook = xlApp.Workbooks.Open(FileName);
Excel._Worksheet xlWorksheet = xlWorkbook.Sheets[1];
Excel.Range xlRange = xlWorksheet.UsedRange;

if (xlRange.Cells[1, 2] != null && xlRange.Cells[1, 2].Value2 != null)
{
    txtRead.Text = xlRange.Cells[1, 2].Value2.ToString();
}

//cleanup
GC.Collect();
GC.WaitForPendingFinalizers();

//release com objects to fully kill excel process from running in the background
Marshal.ReleaseComObject(xlRange);
Marshal.ReleaseComObject(xlWorksheet);

//close and release
xlWorkbook.Close();
Marshal.ReleaseComObject(xlWorkbook);

//quit and release
xlApp.Quit();
Marshal.ReleaseComObject(xlApp);

// Set cursor as default arrow
Cursor.Current = Cursors.Default;

Steps to read and write data from Excel using C#

In this tutorial, we are going to use Microsoft Visual Studio 2017 Community Edition.

Step 1: Create a new C# project in Visual Studio

Open up Visual Studio and create a new Windows Desktop application using Visual C#. You can choose any .NET Framework available in your computer. We are going to use .NET Framework 4.6.1.
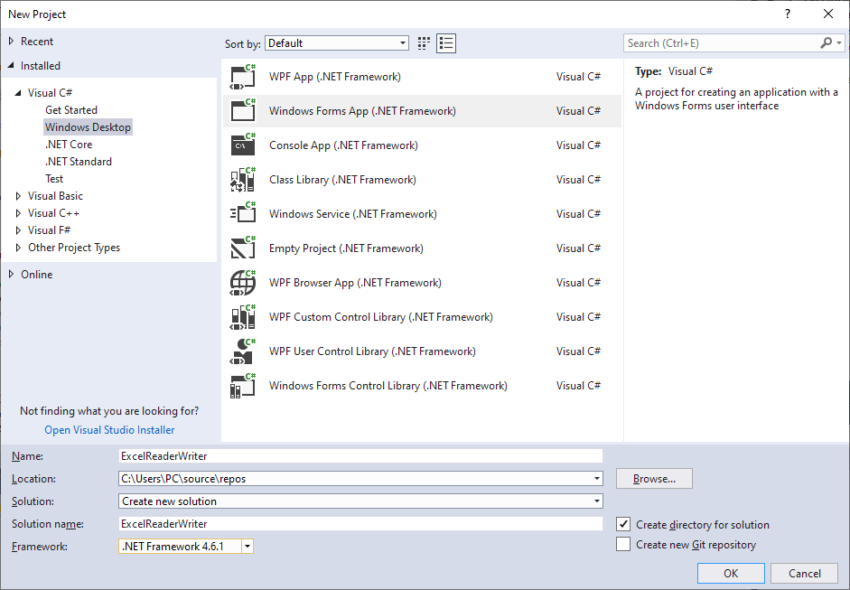
New C# Project in Visual Studio

Step 2: Add COM Component Reference i.e. Excel 14 Object

Next step is to right click on ExcelReaderWriter C# Project under Solution Explorer and choose Add->Reference.
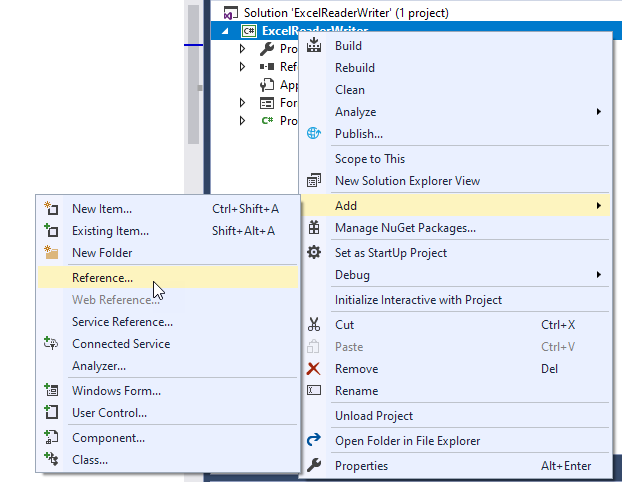
Add Excel COM Object Reference

Then choose COM->Type Libraries and select the desired COM Component for Excel. In our case we used Microsoft Excel 16.0 Object Library.
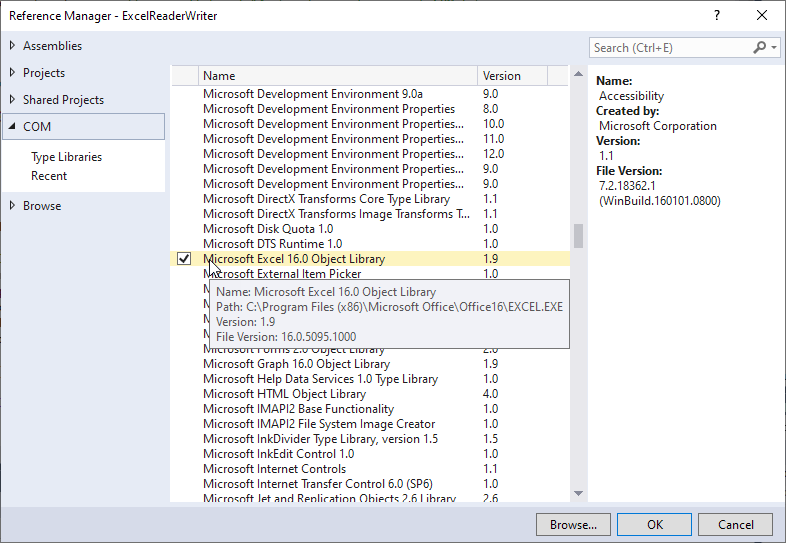
Microsoft Excel 16.0 Object Library

Step 3: Import the namespaces in C# code

Add the following namespaces to import into the code.

using System.Runtime.InteropServices;

//Microsoft Excel 16 object in references-> COM tab
using Excel = Microsoft.Office.Interop.Excel;

Also create a class variable to hold Excel File name i.e.

private string FileName = @"C:\data.xlsx"

Step 4: Write Data to Excel File

Add a Button and TextBox controls on the form. Then double click on the button to show up the code view and Visual Studio Automatically creates the button click event handler. Add the code to the handler so that it looks like below:

private void btnWrite_Click(object sender, EventArgs e)
{
    // Set cursor as hourglass
    Cursor.Current = Cursors.WaitCursor;
    Excel.Application  xlApp = new Excel.Application();
    Excel.Workbook xlWorkbook = xlApp.Workbooks.Open(FileName);
    Excel._Worksheet xlWorksheet = xlWorkbook.Sheets[1];
    Excel.Range xlRange = xlWorksheet.UsedRange;

    xlWorksheet.Cells[1, 1] = txtWrite.Text;
    xlApp.Visible = false;
    xlApp.UserControl = false;
    xlWorkbook.Save();

    //cleanup
    GC.Collect();
    GC.WaitForPendingFinalizers();

    //release com objects to fully kill excel process from running in the background
    Marshal.ReleaseComObject(xlRange);
    Marshal.ReleaseComObject(xlWorksheet);

    //close and release
    xlWorkbook.Close();
    Marshal.ReleaseComObject(xlWorkbook);

    //quit and release
    xlApp.Quit();
    Marshal.ReleaseComObject(xlApp);

    // Set cursor as default arrow
    Cursor.Current = Cursors.Default;

}

Step 5: Read Data from Excel File

Create another Button and TextBox control to use for reading the data from Excel file. Add the following code to button click even handler.

private void btnRead_Click(object sender, EventArgs e)
{
    // Set cursor as hourglass
    Cursor.Current = Cursors.WaitCursor;

    Excel.Application xlApp = new Excel.Application();
    Excel.Workbook xlWorkbook = xlApp.Workbooks.Open(FileName);
    Excel._Worksheet xlWorksheet = xlWorkbook.Sheets[1];
    Excel.Range xlRange = xlWorksheet.UsedRange;

    if (xlRange.Cells[1, 2] != null && xlRange.Cells[1, 2].Value2 != null)
    {
        txtRead.Text = xlRange.Cells[1, 2].Value2.ToString();
    }

    //cleanup
    GC.Collect();
    GC.WaitForPendingFinalizers();

    //release com objects to fully kill excel process from running in the background
    Marshal.ReleaseComObject(xlRange);
    Marshal.ReleaseComObject(xlWorksheet);

    //close and release
    xlWorkbook.Close();
    Marshal.ReleaseComObject(xlWorkbook);

    //quit and release
    xlApp.Quit();
    Marshal.ReleaseComObject(xlApp);

    // Set cursor as default arrow
    Cursor.Current = Cursors.Default;

}

Step 6: Run the C# Program

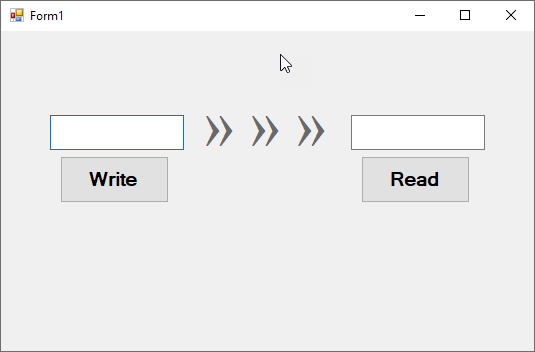
Compile and run the program now. The output should be similar to the one showing below. Enter some data in first text box and click Write button. It will write data to already created Excel file C:\data.xlsx. Similarly, you can click on Read button, which will read the data from same Excel file and show it in the second text file.

C# Excel Reader Writer Program

There are other third party libraries available, which you can use in your code to read and write Excel files. These libraries are available both under open source as well as commercially available. Few of them are:

M. Saqib: Saqib is Master-level Senior Software Engineer with over 14 years of experience in designing and developing large-scale software and web applications. He has more than eight years experience of leading software development teams. Saqib provides consultancy to develop software systems and web services for Fortune 500 companies. He has hands-on experience in C/C++ Java, JavaScript, PHP and .NET Technologies. Saqib owns and write contents on mycplus.com since 2004.
Related Post